Define resources
Resources represent the equipment used to perform scheduled tasks in XECUTE, such as loaders, excavators, drills, blasting equipment, and road crew.
Why resources are necessary
Resources are essential because they make activity areas schedulable. An activity area on its own is just a shape with quantities and attributes. To turn it into a task with a realistic duration, XECUTE needs to know which piece of equipment will perform the work. The resource provides that link.
When a resource is assigned to an activity area, the software combines:
-
The activity’s quantity field (e.g., tonnes, metres).
-
The resource’s production rate.
Put simply, this calculation determines how long the task will take and when it can fit into the schedule. (Other factors determine the task duration and actual production rate, refer to Define site-level resources (and about and production rates).) Without resources, the schedule cannot run.
Once resources are in place, XECUTE can:
-
Visualise execution by showing where and when equipment works in the 3D scene and Gantt chart.
-
Apply operational limits by respecting rosters, availability, and utilisation so the plan reflects reality.
-
Sequence work safely by enforcing dependencies and avoiding conflicts between tasks.
Resource configuration steps
Setting up resources in XECUTE involves several steps.
-
Define resource classes (here: Config > System Management > Resources)
The other processes can be done later, after you’ve set up a site.
Define resource classes
The most important step (this one) involves defining resource classes.
A resource class is a global profile that defines the common properties for a group of similar equipment. Its like a template: every individual resource you create under this class inherits its settings by default. This approach saves time and ensures consistency across the project.
A resource class includes:
-
Permitted activities: Which tasks the equipment type can perform (e.g., Mining, Drilling).
-
Base production rates: Default rates for each allowed activity.
-
Travel speed: Used to calculate movement time between activity areas.
-
Visual appearance: The 3D model, scale, and colour used in the scene.
-
Mining position settings: Level, orientation, and offset relative to the mining face.
Once defined, you can define individual resources within the class. If a specific site or piece of equipment needs different settings, you can apply site-specific overrides or individual resource overrides later without changing the global definition.
How to define resources
To define resources
-
Add a resource class.
-
Define the class’s global properties, including its name, appearance, and mining position.
-
Assign the resource to relevant activities and define base production rates.
-
Define the individual resources that make up the class.
-
Optionally override settings for individual resources.
Configure resource classes
On the Resources list, manage resource classes with these options:
-
Add: Create a new resource class.
-
Remove: Delete the selected resource class from the list.
-
Save: Apply any changes you’ve made to the selected resource class.
Properties
|
Resource Type |
|
|
Name |
Defines the name of the resource profile (e.g., CAT-992, PH-2800, Road Crew…). Individual resources within the profile will have different, unique names. |
|
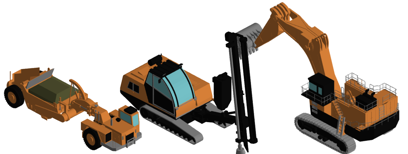
Image |
Defines the model of the profile’s resources, used as its appearance in the scene.
Examples of 3D models |
|
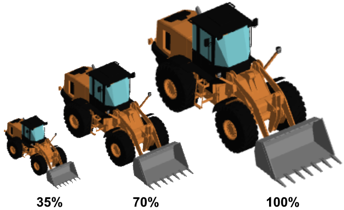
Scale |
Define the scale of the resource’s model, relative to the model’s original size. You can check the selected model’s dimensions via the tooltip. Below 100% for smaller, above for bigger.
After adding resources to sites, you can check their size in the scene – especially relative to other resources |
|
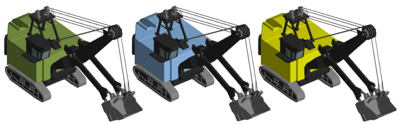
Colour |
Defines the colour of the resource model.
|
|
Travel Speed |
Defines the speed at which a resource travels from one activity area to another. For more information, refer to Travel speed below. |
|
The Level, Orientation, and Offset properties determine the position of the resource as it mines an activity area. For more information, refer to Resource mining position below. |
|
|
Level |
When mining an activity area, this property defines whether the resource is positioned on area’s Roof or Floor. |
|
Orientation |
When mining an activity area, this property defines the orientation of the resource relative to the mining direction. Enter a value up to 360. If 0, the resource faces the mining direction. |
|
Offset |
When mining an activity area, this property defines the distance maintained between the resource and the mining face. Enter a negative value to move the resource backward, and a positive value to move it forward. If 0, the resource is immediately at the mining face. |
|
Roster |
Assigns the resource to a roster, which determines its daily operating hours. The roster defines the days of the week that the resource can work – as well as the specific times. For more information, refer to Define operating hours. |
Travel speed
After a resource mines an activity area, it travels along a certain path to the next assigned activity area. By default, this path is a straight line between the areas, but you can modify the path.
After the resource mines its first assigned activity area, it mines the second assigned activity area. The travel speed determines the speed at which is travels between two activity areas along its assigned path. The production rates were exaggerated up and travel speed exaggerated down to show the effect.
This travel time is shown as a task in the Gantt chart, between the resource’s assigned activity areas. The time is determined by dividing the distance (travel path distance) by speed.
Time = (Distance / Speed)
If the distance is 1km/h, and if the speed is 20kh, the duration is three minutes.
The tooltip shows the details of the travel time, such as the start and end dates, start and finish location, and duration.
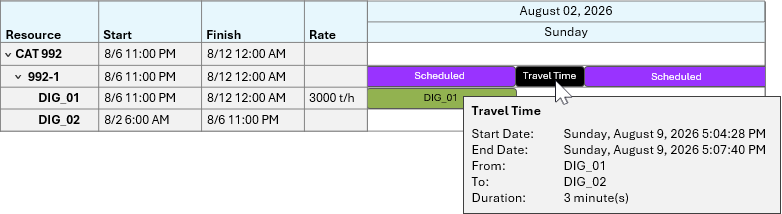
A simplified view of the Gantt chart, showing details of the travel task
Resource mining position
When a resource is assigned to an activity area, XECUTE uses its mining position settings to help determine where and how the equipment is positioned in the 3D scene – as it mines the activity area in the mining direction. These settings determine how the resource is positioned for visualisation purposes during scheduling.
properties you enter should depend on the type of equipment and mining method it uses.
-
Level: Defines whether the resource mines along the roof of the activity area or the floor (on the topography).
-
Use Roof for equipment that operates from above.
-
Use Floor for equipment that operates on the ground surface.
-
-
Orientation: Defines the direction the resource faces relative to the activity area’s mining direction.
-
0 means the resource faces directly along the mining direction.
-
Other values (e.g. 90, 180) rotate the resource accordingly.
-
Enter any value from 0 to 360 degrees.
-
-
Offset: Defines how far the resource is positioned from the mining face, measured in site units.
-
Use this to simulate realistic spacing between equipment and the mining surface.
-
Control these three properties to reflect the type of equipment and mining method used.
Example
In this scenario, the resource:
-
Operates on the activity area roof.
-
Maintains an offset of 20m from the mining face.
-
Has an orientation of 180° from the mining direction.
This setup can reflect retreat-style mining or scenarios where equipment operates from above the ore zone.
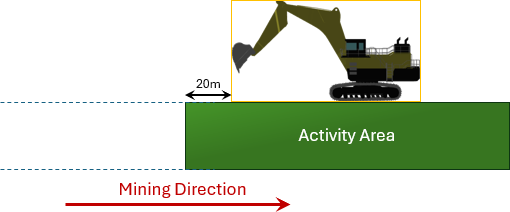
An illustration of the effect of the properties used in this scenario

[GIF] The resource scheduling the activity area in the scene
In this scenario, the resource:
-
Operates on the activity area floor.
-
Has no offset from the mining face.
-
Has an orientation that faces the mining direction (0°).
This setup is typical for open pit mining or surface operations where equipment works from the bench floor.
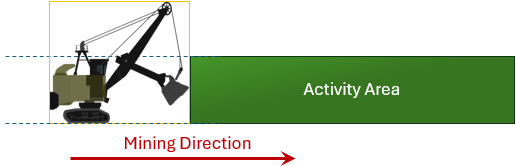
An illustration of the effect of the properties used in this scenario
[GIF] The resource scheduling the activity area in the scene
Activities and production rates
A resource must be assigned to activities. This allocation determines the activity areas that the resource can be assigned to. Each resource-activity allocation also requires a base production rate.
Activity assignment
Resources must be assigned to specific activities to control which tasks they can perform. This assignment ensures that only relevant resources appear when scheduling activity areas – making the process cleaner and more accurate.
For example, when you assign resources to the selected activity areas, you see a focused list of the resources that can perform that activity – rather than all resources.
To assign an activity to a resource
-
On the tree, select the resource.
-
On the list of activities, select the Allowed checkbox of the relevant activity.
Base production rate
For more information about production rates, including using expressions to build them, refer to Define site-level resources (and about and production rates).
A resource’s base production rate defines how quickly it performs a given activity, such as mining, drilling, or blasting, on an activity area. This rate is configured per resource-activity combination and is used during scheduling to calculate task durations.
For example:
-
A resource might perform Mining at 3,500 t/h.
-
The same resource might perform Drilling at 14 m/h.
The base rate acts as the starting point. It can later be overridden or modified with site-specific settings or calendar-based adjustments, which is useful for tailoring performance to specific conditions (e.g. slowing down for complex geology or equipment constraints).
By default, all resources in a class inherit the same rate, but you can override it for specific resource-activity combinations.
You can view the effect of different production rates by observing the resource mining speed in the schedule animation, looking at durations on the Gantt chart, and analysing durations in reports.

|
Activity Area |
Mass |
Duration |
Production Rate (Actual) |
|---|---|---|---|
|
DIG_01 |
158,290.56 t |
4d 9hr 31min 37s 2ms |
1,500 t/h |
Example1: The resource mimes activity area DIG_01 at 1,500 t/h
|
Activity Area |
Mass |
Duration |
Production Rate (Actual) |
|---|---|---|---|
|
DIG_01 |
158,290.56 t |
2d 15hr 18min 58s 32ms |
2,500 t/h |
Example2: The resource mines activity area DIG_01 at 2,500 t/h

|
Activity Area |
Mass |
Duration |
Production Rate (Actual) |
|---|---|---|---|
|
DIG_01 |
158,290.56 |
1d 21hr 13min 33s 24ms |
3,500 t/h |
Example3: The resource mines activity area DIG_01 at 3,500 t/h
Individual resources
After you set up a resource class, you define the individual resources within the class. Each resource can have different settings, tailored to the equipment, such as different visual appearances or production rates.
Add resources
To define individual resources
-
Set up a resource class, then select it on the tree.
-
For each individual resource you want to create, click Resources – Add.
-
Enter a unique name for each resource, and optionally enter property overrides.
-
Click Save.
Properties
|
Resources |
|
|
Resource |
Defines a unique name for the individual resource (e.g., SH013, SH014…). |
|
Scale |
Overrides the class’s scale for this resource’s 3D model (as a percentage of the model’s original size). |
|
Colour |
Overrides the class’s profile colour for this resource’s 3 model. |
|
Variable Rate |
Allows the resource to reduce its production rate dynamically to help meet blend or quality objectives. Requires Reduce Production to Achieve Blend to be enabled at the site level. This is an optional and advanced feature. Not recommended for initial project setup. For more information, refer to Varying dig rates. |
|
Min Rate (%) |
Defines the lowest percentage of the resource’s base production rate it can operate at when Variable Rate is enabled. This is an optional and advanced feature. Not recommended for initial project setup. For more information, refer to Varying dig rates. |
|
Rate Overrides |
Shows which activities have custom production rates for this resource. Click to open the Production Rate table, where you can enable overrides and enter new rates for specific resource–activity combinations. |
Override production rates
The Rate Overrides property lets you adjust production rates for an individual resource when it performs specific activities. By default, all resources in a class inherit the same base rates from the resource profile. However, not every piece of equipment performs identically. Some units may consistently operate faster or slower than others due to age, condition, or configuration. Rate overrides allow you to model these differences.
Access the override table
When you click the Rate Overrides property in the resource’s details, XECUTE opens the Production Rate table. This table lists every activity the resource is allowed to perform. For each activity, you’ll see:
-
The current base production rate (inherited from the resource profile).
-
An Override checkbox that enables customisation.
-
A field to enter a new rate when the override is active.
Apply an override
To override a rate
-
Open the Production Rate table from the Rate Overrides property.
-
Locate the activity you want to adjust.
-
Select the Override checkbox.
-
Enter the new production rate for that activity.
-
Save your changes.
Once saved, the overridden rate replaces the inherited rate for this resource–activity combination. The change is immediately reflected in scheduling calculations and visible in the Gantt chart as updated task durations.
When to use overrides
Use overrides when you need to represent performance differences between individual resources in the same class. For example:
-
Shovel01 consistently loads at 3,500 t/h.
-
Shovel02, an older unit, loads at 2,800 t/h.
Rather than creating a separate resource profile, you can override the rate for Shovel02 while keeping both resources in the same class.